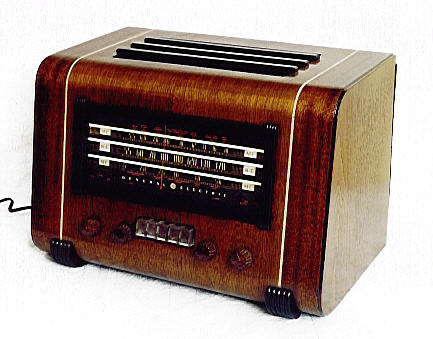
GE Model L-740 Tabletop Radio (1941)


I love the sleek 1940s style of this large tabletop. As you can see from the before and after photos,
it required total restoration. Now that the work is done, this handsome radio occupies a prominent position
in my office.
Description
According to McMahon's book A Flick of the Switch, where the radio is pictured,
model L-740 "De Luxe" was made in 1941 and sold for $54.95. It is a largish tabletop,
measuring 12 inches high, 17 wide, and 11 deep. The design is dramatic, using
white "racing stripes" and dark accent pieces to contrast with the veneered cabinet.
I especially like the sled-like feet that peek out from the bottom.
This three-band set covers the standard broadcast frequencies from 550-1720 Khz
and shortwave from 1.7-5.2 and 5.2-18.1 Mhz. With seven tubes including an
RF amplifier, it is a strong receiver. Two 6K6 tubes in a
push-pull configuration drive a 6.5-inch speaker,
providing rich, powerful audio.
The large, slide-rule type dial is attractive, with red, gold, and white lettering.
Legends for the radio's knobs are painted on the dial, giving the cabinet an uncluttered appearance.
Below the dial are five pushbuttons for station presets.
The leftmost knob combines the power switch and tone control. Next in line,
from left to right, are the volume control, tuning knob, and band change switch.
Inside the cabinet are two loop antennas, dubbed "Beam-a-Scopes" by General Electric.
The second Beam-a-Scope is switched in when you choose the
highest shortwave band. Thanks to the extra loop, you can get decent
shortwave reception without the usual long wire antenna. For
serious shortwave listening you would still benefit from a long wire, of course.
Here is the tube lineup.
| Tube |
Type |
Function |
| V1 |
6SG7 |
RF amplifier |
| V2 |
6SA7 |
Converter/oscillator |
| V3 |
6SF7 |
IF amp/detector/AVC |
| V4 |
6SC7 |
Audio/phase inverter |
| V5 |
6K6GT |
Audio output |
| V6 |
6K6GT |
Audio output |
| V7 |
5W4GT |
Rectifier |
Electronic Restoration
This radio was found by a friend who noticed it in a neighbor's basement.
Although the set needed considerable work, the electronics looked better than average,
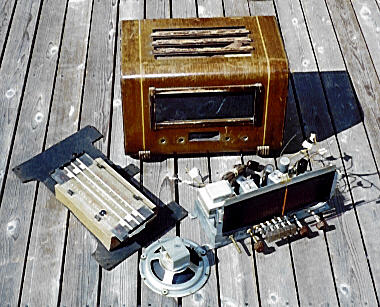
so I offered $25 and brought it home. The following photo shows the radio
after disassembly for cleaning.
Although the cabinet's veneer was intact, the finish was flaking and
badly worn, especially on top. A previous owner made an unsuccessful attempt to replace
the grille cloth. Cut too small to fit the wooden form, the cloth had
come unglued and hung in sad wrinkles under the grille bars on top of the set.
The electronics were in much better condition. All of the tubes tested OK.
After my standard preliminaries (cleaning all the controls, bringing the power up
slowly, etc.), the radio worked well except for some buzzing and distortion at higher volume.
Ignoring the audio problem for the time being, I replaced all of the old paper capacitors
with fresh ones. When this was done, I substituted a
new test speaker and was rewarded with strong, undistorted audio.
I quickly confirmed that the original speaker was bad by testing it with another radio.
Top-mounted speakers tend to act as dust-catchers, and this one was no
exception. When I removed it from the cabinet, I had found a large "dust bunny"
covering the middle of the cone. The loose grille cloth may have hastened the
dirt collection, but every top-mounted speaker will suffer this condition sooner or later.
The buzzing was most likely caused by dirt particles stuck in the tiny space between
the speaker's moving parts. In hopes of saving the original
speaker, I tried a couple of tricks to remove the dirt. First, I carefully vacuumed
out the center using a powerful Shop-Vac. Then I turned the speaker upside down
and let the radio play at moderate volume overnight, in hopes that any remaining
dirt might work its way back out. These tricks have worked for me before, and
they cost nothing to try!
Luck was not with me this time, however. The speaker still buzzed horribly the next day,
so I threw in the towel and installed a new replacement. It's possible to send speakers
off to be rebuilt, but I couldn't
justify the expense in this case. Rebuilding the speaker might cost more than
the radio is worth. I'll keep the original speaker with the
radio, however, in case some future owner wants to rebuild it.
With a new speaker in place, the radio played beautifully. So much for the
chassis. Now for the cabinet!
Cosmetic Restoration
I generally avoid stripping a radio cabinet down to bare wood if I can avoid it.
Although the finish was quite worn, the underlying wood was in good shape,
with no heavy scarring or chips in the veneer. Taking a clean cloth, I gently rubbed
the entire cabinet using a mixture of lacquer thinner and retardant. This re-smoothed
the finish without removing it. When the color looked even, I let the cabinet dry and
buffed it gently with #0000 steel wool.
This cabinet has two distinctive white stripes, running vertically from the
feet in front all the way over the cabinet top. At first glance, I thought
the stripes were painted, but on close examination,
I saw that they were white putty, laid in two channels between
veneer strips. This was obvious because a small piece of one stripe had fallen
out of its channel near the very back. I replaced the missing piece with
a strip of new white putty, then set the cabinet aside to let the putty dry overnight.
While the putty was drying, I pulled out the replacement grille cloth which I
had ordered earlier from Antique Electronic Supply.
Not knowing what the original cloth looked like, I picked a simple gold herringbone design
used in other 1940s GE radios.
As in many radios, the cloth is not attached directly to the
grille bars. Instead, it is glued to a flat wooden or cardboard form which has a hole for
the speaker. The form goes between the speaker and the cabinet, and pressure from
the speaker helps to keep the cloth in place. (In addition to cutting the cloth too small,
the previous owner had mistakenly tried to glue it to the grille bars, a method
which virtually guaranteed a loose, saggy cloth.)
The next photo shows the new grille cloth being lightly stretched onto the wooden form.
After stretching, I sprayed the cloth with laundry starch to help keep it flat.
When the starch was dry, I glued it to the form one side at a time, replacing the pins
after the glue went on, to keep the cloth under light tension. The result is
a nice, tight cloth that looks great.
Looking at the cabinet the next day, I decided that the color was too light.
Resmoothing the finish had removed more color than I had realized at first.
The new putty felt pretty dry, so I applied a light coat of walnut stain
to the entire cabinet.
You could also darken the color by spraying on a coat of brown toning lacquer,
but I didn't have the right color of toner on hand, so I used the stain instead.
For some reason, the new putty absorbed more stain than the old stuff, so the little patched
place turned out slightly darker than the rest of the stripe. But you'd have to
look closely to notice it, so I didn't bother redoing it.
On this cabinet the feet, dial surround, and grille bars are extremely dark brown.
I used dark walnut stain to eliminate a few scratches and scuffs on these contrasting pieces.
An artist's brush made it easy to cover
the detail areas without slopping stain onto the lighter veneer. In the factory, these
pieces were probably sprayed with dark lacquer before being glued to the cabinet.
On some cabinets, it's possible to mask off all but the contrast areas and
spray them with dark toning lacquer. The difficulty of masking around all of these
small pieces wasn't justified in this case, and I doubt that anyone could tell
what was used to color them.
After the stain was dry, I gently buffed the cabinet with #0000 steel wool,
removed all dust with a tack rag, and sprayed on two coats of clear lacquer.
Then I gently buffed
the cabinet one last time, bringing the glossy finish down to a satin glow.
The final cosmetics involved carefully cleaning the dial glass and polishing
the knobs with Novus #2 plastic polish.
Final Thoughts
With that, the restoration was complete
and I could put my prize back together. This photo shows the result.
The friend who found this radio for me was pretty impressed with
the finished product. I told him to keep his eyes open for more good
deals like this one. If he keeps turning up treasures, maybe
one day he'll get a nice restored radio as a finder's fee!
|