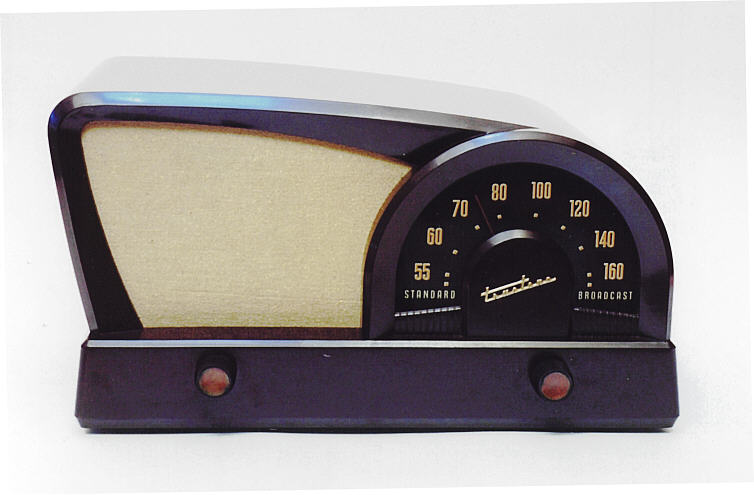
Truetone D2017 "Boomerang" Bakelite Radio (1950)


This boomerang shaped Truetone radio has one of the most
recognizable profiles in the world of radio. Made in 1950, it
was also available in ivory painted Bakelite as Model D2018. A similar
boomerang set was the Philco 49-501, also offered as a
radio/phono combination set in model 49-1401.
The Truetone boomerang receives the standard broadcast band and uses
six tubes: 12BE6, 12BA6, 12BA6, 12AV6, 35C5, and 35W4. On the back
of the chassis is a phono jack and switch, allowing you to use
it as the amplifier for an external phono player.
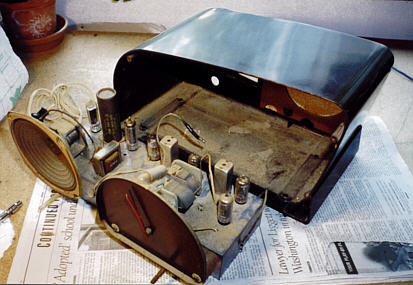
When I purchased this radio, the cabinet and dial were in good shape,
but it
was extremely dirty, as shown in the following pre-restoration photo.
The dust in the chassis was almost half an inch thick,
and all three wires to the loop antenna had been broken, then
crudely patched with electrical tape. As a result, the radio
played intermittently, cutting out completely whenever
one of the broken wires got jiggled.
The grille cloth was torn along its lower edge, as well as faded.
The edges of the cloth, where it was covered by the cabinet,
are still a rich, almost rosy, tan. The center, which had
been exposed to light, was faded almost white.

Restoring the electronics on this radio was a
straightforward job. After replacing all of the old
paper capacitors,
one pilot lamp, and the broken antenna wires, it played like a champ.
The cabinet and dial also required no more than routine cleaning
and polishing.
A couple of cabinet details are worth
mentioning. The polished Truetone logo in the center of the
dial is a single piece of solid brass, fastened with two
wires which pierce the cabinet and are then bent down.
The subtle shadowing of the dial lettering was made in an
interesting way. Virtually all painted
dials have the lettering on one side or the other, but
this one is painted on both sides. The lighter foreground
portion of each letter is painted on the front of the glass,
while the darker shadow is painted on the back. This gives
a real three-dimensionality to the dial lettering.
The grille cloth was not salvageable, unfortunately. As
you can see in the previous photo, the cloth had a sparkly
appearance, which adds a lot to this radio's sophisticated design.
Coming up with a suitable replacement for this cloth took more
time than all the other restoration work combined.
In Search of a Grille Cloth
I began looking for a replacement cloth at two
familiar sources: Antique
Electronic Supply and Grille
Cloth Headquarters. Neither had a cloth that looked even
close.
Next, I visited a series of local fabric stores, looking
for a close match. Surely, I thought, someone, somewhere, must
have manufactured a light-colored cloth with some kind of
sparkle in it. No such luck. In fact, after pawing through
thousands of fabric samples in several locations, I didn't
find anything close to the original, with or without sparkles.
I even tried a costume store, again with no luck.
Then I had another idea. Although I had exhausted the local sources,
perhaps the Internet had more to offer. Firing up the web
browser and newsgroup reader, I went in search of online
fabric sources, or possibly someone who could give useful advice.
After considerable searching, I couldn't find anything resembling
an online fabric store. I did find a national fabric store website
which included a customer's message board, however. I posted a message
asking for advice.
By the next day, I had gotten only one piece of advice. One
person, looking at the scan of the original fabric which
I had posted online, said that it looked similar to burlap.
Meanwhile, looking closely at the original, I noticed that the sparkles
were not created by weaving in
metallic thread, as in many cases, but by glueing or spraying some
sparkly substance onto the surface of the cloth.
If I could find a cloth of similar texture and color,
then stick on some sparkles, perhaps all would be well.
Come to think of it, I could even dye a lighter cloth to the
right color, if needed.
Back to the fabric stores I went again, this time looking
only for something with a reasonable close texture,
colored no darker than the original. Amazingly, this search
turned up nothing that looked good, either. I did find some
light-colored burlap, however. The original cloth really didn't
look as coarse as burlap, but perhaps this was the best that
I could do. Feeling discouraged, I bought 1/3-yard of
the burlap. That gave me plenty of extra material for
experimentation (or mistakes!).
Out of the Dyeing Pan, Into the . . .
Before worrying about the sparkles, I had to dye the
cloth to the right color. Rather than risk the entire
swatch on a possible disaster, I began by
dyeing four small test squares.
For dye, I used a couple of tea bags, one
of ordinary black tea and a second of Red Zinger, in hopes of approximating
the slightly rosy tan of the unfaded original cloth.
No special equipment is used
for this type of dyeing. You simply pitch your cloth and the
tea bags into a pan of water and simmer on the stove until
you like the color. The next photo shows the results of the dye test.

Beginning at the left of the photo, the two lighter squares
were dyed in black tea only, for
10 and 20 minutes, respectively. The two darker squares were
dyed in both teas, for 30 and 45 minutes, respectively.
All of the test squares lightened considerably after they dried.
While wet, the two lightest squares looked about right in color,
and the two darker ones looked much too dark. After they dried,
the lightest two squares were much too light, the third looked
close, and the darkest one looked very good, indeed.
Perhaps this would work, after all!
The next morning, I cut a bigger swatch of the burlap and dyed it using
the same method. While it dried, I drove to the local hobby store to
buy spray adhesive and gold-colored spray glitter, and to the grocery store
for some spray starch.
Since the test squares weren't needed any longer, I used them to
test the spray glitter. Although the glitter particles weren't as large
as in the original cloth, they went on more densely, and the
overall effect looked just fine.
Viewing the result, however, I
came to a disappointing conclusion. Even dyed the right color,
the burlap fabric was much cruder in appearance than
the original. Despite spending hours getting to this point,
I simply couldn't put this rough fabric on such
a sleek-looking radio.
Dye Pot, Round Two
Having exhausted all the local sources, as well as the
Internet (or, at least as much as I had the patience
to search), I felt pretty discouraged at this point.
In fact, I did no work on the radio for a few days.
One day, however, I went up to the bonus room in our
new house, where we are still unpacking miscellaneous
boxes from our recent move. One of those boxes was
filled with my wife's fabric scraps.
Without much hope, I pawed through the box, and guess what . . .
buried about halfway down was a piece of muslin-like material whose
texture looked very close to the original. Eureka!
Back to the dye pot for round two. One good thing about
repeating processes is that they go more quickly the second
time through. After dyeing this material, I carefully spread
it flat and left it to dry overnight.
The next day, I ironed the fabric using spray starch to
stiffen it a little, then sprayed on the glitter.
So far, so good. When the glitter was dry, I sprayed on a
very light coat of clear acrylic to help bond the glitter to the fabric.
After all this trouble, the last thing I needed was for the
fabric to shed all its glitter in a month or two.
In case you're wondering,
the glitter doesn't show up well in the head-on photo at the top
of the page. Dark shiny radios are not easy to photograph, and
I finally chose a shot that minimized glare on the cabinet and
dial, even though the glitter was virtually invisible that angle. But
trust me, it's there!
Making a Grille Backing
The original grille cloth was glued to a cardboard template,
cut to fit the inside of the cabinet.
In the course of driving all over the county and visiting several
stores with original grille cloth in hand, its cardboard
backing had broken in a couple of weak places. Before that
had happened, the backing had warped, possibly from humidity,
so that the top above the speaker opening stuck out noticeably
farther than the rest of the backing. In fact, it might have been
the warping of the template that stretched the fabric to the
point of tearing along the edge.
Rather than try to salvage the old cardboard, I made a new
backing out of foam core, which is both strong and light.
The first step was to trace a cutting pattern of paper
from the old backing. Then I transferred the outline from
the pattern to the foam core, and carefully cut out
the new backing using a razor blade and sharp craft knife.
The next photo shows the new backing and the tools used
to create it.

Before glueing on the new fabric, I tested the new backing
in the cabinet for fit. As the next photo shows, it fit
perfectly.

Gluing the New Grille Cloth
The tricky part of installing a new grille cloth is gluing
it in place without any sags in the speaker opening. Applying
a little starch when ironing the cloth gives it more body
and helps to keep it wrinkle-free.
You also need to keep the cloth perfectly flat, and under
some tension if possible, when applying the glue. Certain
cloths can also be slightly dampened right before application,
so that they shrink tight when dry.
To prepare for gluing, I placed the cloth face sparkly
side down on a clean board and temporarily pinned the sides
all around with pushpins, gently pulling it tight as I pinned.
Next, I sprayed an even coat of spray adhesive to the front
surface of the backing.
The moment of truth was almost at hand, but
it's important not to rush this stage. To ensure a good
bond with porous materials such as fabric, you must wait until the
spray adhesive reaches an "aggressively tacky" state.
You test the tackiness by gently touching the glue with
your finger. When it feels like you might not be able to
get your finger off easily next time, the glue is ready!
When the glue felt right, I pressed the backing firmly
down onto the fabric on the board, then weighted it
with a book. After a few minutes, I removed the book and
carefully cut through the perimeter of the cloth, following
the edge of the backing, with a sharp razor blade.
Turning the backing over, I carefully cut the mounting holes
with a razor blade, and the new grille cloth was complete.
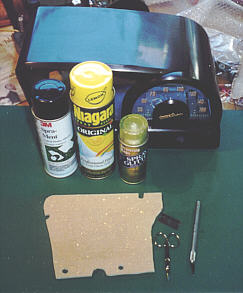
The next photo shows the cloth attached to its backing,
along with the spray adhesive, glitter, and starch that I used.

At long last, the grille cloth was ready to be reinstalled.
Once back in the cabinet, it looked great! I was very glad
I had spent the extra time to find a more appropriate fabric
than burlap.
Incidentally, when installing a grille cloth that is held in place
with screws, always cut or poke a guide hole for each screw.
If you poke the screw straight through the fabric without a
guide hole, it may catch some of the fabric threads and
pull your cloth out of shape.
Final Touches
At this point, the radio had been electronically restored, the
cabinet and dial cleaned, and the grille cloth refabricated.
Only a few details remained.
The speaker sounded decent, but I could see a number of
worn spots around its perimeter. In places, you could
almost see daylight through the worn areas. To avoid
future problems, I reinforced the worn spots by gluing
small pieces of tea-bag paper on with speaker cement.
The dial pointer is made of metal and plastic, with a
bright red plastic piece held in a thin metal channel.
The plastic piece had warped slightly and its end had
come loose from the channel, giving it a droopy appearance.
Using household glue, I glued the red plastic piece back
into the channel where it belonged. I also cleaned the dial
backplate, which had somehow escaped my earlier cleaning.
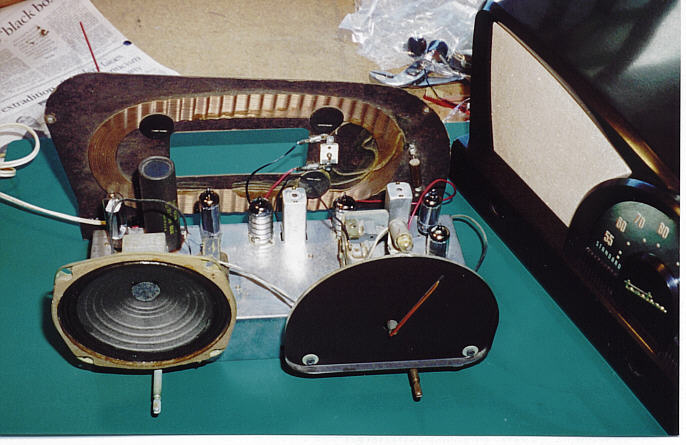
The next photo shows the radio with electronics and
cabinet restored, just before putting it back together.
Giving the inside of the cabinet one last wipedown, I then
reinstalled the radio in the cabinet, securing the four
mounting screws on the bottom. Then I pushed the knobs
back onto their shafts, reattached the antenna wires,
and mounted the cardboard cabinet back.
Although I had played the radio many times in the course
of restoring the electronics, this was the first time I
had played it inside the cabinet since first buying it.
Another moment of truth, in a way . . .
When I first powered up the radio, something seemed terribly
wrong. Although the radio had good reception, and played
well, the dial pointer was way off, pointing to a place
on the dial over 200 Khz higher than the station that was
actually playing.
Could I have messed up the radio's alignment that badly?
Oops, wait a sec. More likely, I had slipped the pointer on
its shaft while reglueing the little red piece. I pulled
the radio back out of the cabinet, and discovered that this
indeed was the case.
I removed the pointer from the shaft and gave
the pointer's cylinder a gentle squeeze with a pliers
to make it fit tighter.
Then I turned the tuner all the way closed and put the
pointer back on, pointing exactly horizontal in the
right direction. I held
the cabinet close to the chassis to make sure this was
done accurately.
Reinstalled in the cabinet a second time, the radio was
well and truly finished. It seems like almost every
restoration project has one of those "duh!" moments where
you find that you have overlooked something simple. In
this case, I had jostled the dial pointer without noticing
it, and neglected to check its position before putting the
radio back in its case. A small detail, but one that even
the most inattentive user would notice!
Except for the adventure of the grille cloth, this was a fairly
trouble-free project. And I learned some things about
matching and dyeing cloth that I'll be able to use in the future.
Newly restored, this little Truetone plays well and is one of the most eye-catching radios
in my entire collection. Boomerang, you're here to stay!
|