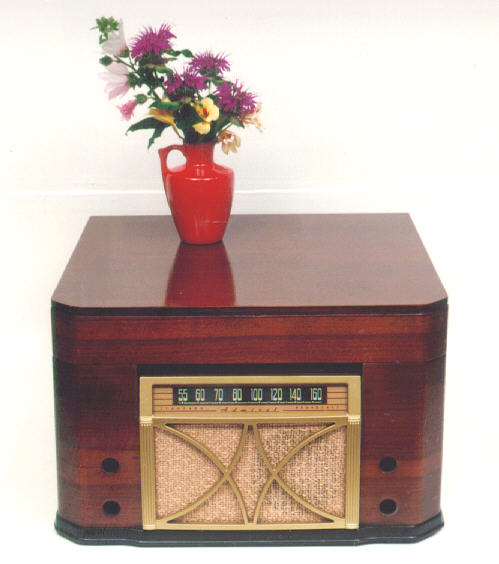
Admiral Model 7RT42-N Radio/Phono (1947)


After a long trip across the country, and a long sojourn in my workroom,
this 1947 radio/phono finally got restored.
This set was donated to me
by fellow collector Mark Garcia, on the condition that I fix
it up some day. He had gotten as far
as disassembling the set and stripping the cabinet before he
ran out of gas.
I agreed to give it a good home, explaining that
the restoration might have to wait until I had
cleared some other projects from the queue.
In the summer of 1998, the Admiral's turn finally came!
Restoring the Cabinet
Since the cabinet had already been stripped, I used this opportunity to
try applying a lacquer finish from bare wood, something I hadn't attempted before.
Virtually all wooden radio cabinets were finished in lacquer. This finish was preferred by manufacturers
because it dries in minutes, making it possible to apply several
coats in a day.
If you are refinishing a radio cabinet, please
use lacquer. Other finishes, such as varnish or oil, may look
similar to the casual eye, but purists reject those as un-authentic.
I had not been that fussy in my earliest days of collecting,
in part because I had more experience with rub-on or brush-on finishes. In the spirit of learning, however, I ordered
some Mohawk lacquer spray products from
Antique Electronic Supply.
The lacquer was easy to apply and the final result
looked great.
Ventilation is very important when spraying.
If you can't work outdoors, then
you should set up an exhaust fan to remove the fumes as you work.
If you set up outdoors, the location should be sheltered from wind,
in a spot where dirt and dust won't fall on the object, and out
of direct sunlight.
Our carport provided
an ideal sheltered location. I set the cabinet on a large cardboard
box covered with newspapers, out in the middle of the carport,
an arrangement that allowed me to move around all sides of the cabinet
as I worked.
Incidentally, I normally avoid stripping a cabinet to bare wood.
That's not necessary unless the old finish has suffered drastic
damage. And refinishing a stripped cabinet is more work than
merely "reviving" or touching up an original finish.
In any case, this cabinet already had been stripped,
so the first step was to spray on a couple of coats of Mohawk sanding sealer,
sanding very lightly in between coats. A sealer does what the name
implies, sealing off wood so that subsequent coats go on smooth instead
of seeping into the pores of the wood. For wood with larger pores (mahogany is an example),
you might need to precede this step with an application of filler.
The next step was to apply color by spraying on brown lacquer
toner. Stripping the cabinet had left the finish much too light.
Toner was used by cabinet makers to bring out grain patterns,
to mask color differences between different kinds of wood, to
create two-tone effects and shading.
The final step was to spray on several coats of clear satin-finish
lacquer. After each coat dried, I carefully rubbed it out using
#0000 steel wool, to get a consistently smooth finish and eliminate
any little blemishes from falling dust particles, etc. Because
the top gets more wear than the sides, I gave it a couple of
extra coats for good measure.
I found spray lacquer quite easy to work with, and much
faster than brushing or rubbing. Spray with even strokes, holding the can at the recommended distance
and keeping it moving. If you get too close or pause in one place
too long, you may form drips which you'll have to fix later.
If you hold the can too far away, then the finish may become uneven or
speckly.
Another advantage of lacquer is that it's easily reversible. If
you don't like the results, you can remove it with lacquer thinner
and try again.
I would not recommend
trying to brush on lacquer. I did that as an experiment a
couple of years ago, and found it impossible to get a smooth
finish. Lacquer simply dries too fast.
The metal part of the grill had to be repainted to get
rid of discoloration and blemishes. Many metal radio pieces
are brass, which can be easily polished. This piece was actually
pot metal, painted in a brassy color, so repainting was
the only alternative.
Is It Lacquer, Shellac, or . . . ?
In rare cases, usually with much older radios, cabinet makers used shellac in place of lacquer.
It's easy to tell the difference between
shellac and lacquer. Put a little denatured alcohol on a soft rag and
carefully rub the finish in an unobtrusive spot. If it starts to soften and get tacky, then it is shellac. Alcohol will not soften
lacquer and other harder finishes.
To test whether a finish is lacquer, put some lacquer thinner on a
cloth and rub. If the
finish starts to soften, it is lacquer. If the finish
still doesn't soften, then it is a non-original finish such as varnish, oil, or (horrors!) perhaps modern polyurethane.
Don't get carried away while performing these tests. If you
rub too hard or too long, you'll rub a hole in your finish.
Some "finish restoring" products exploit the fact that shellacs and
lacquers can be dissolved. They combine a solvent such
as lacquer thinner with a retardant that slows the dissolving action.
This allows you to soften the upper layers of the finish and
re-spread them to their original smoothness.
This type of product
is useless for finishes such as varnish or poly, which don't dissolve.
Don't try to restore a cabinet with undiluted solvent such as alcohol
or lacquer thinner. You'll probably end up removing the finish.
To Refinishing or Not?
As noted before, I try to use the least intrusive refinishing
process that gives acceptable results. I won't strip a
cabinet unless the
existing finish has been so seriously stained or damaged that
nothing else can make it presentable.
For old radios, just as for antique furniture in general,
serious collectors generally prefer a well-preserved original finish, including
some normal marks of wear, rather than an unnatural
"too new"
finish. Everyone's tastes are different, of course. If you
can't live without that showroom look, then go ahead and
apply it. Just be aware that your effort may actually
decrease the set's value, should you wish to sell to a
knowledgeable collector.
A number of my radios, including some of the most valuable,
have not been refinished at all, for that very reason.
In our Restoration section, you
can find several more articles with details about refinishing
wood cabinets.
Value of Radio/Phonos
Radio/phono combination sets like this are usually valued quite
low in the collector guides. This set, for example, lists
at $20-$30 in the Bunis guide (4th edition). At that value, I could
just about cover the cost of the lacquer used to refinish it!
Why such low prices? Size and weight are big factors. Even a fairly compact
radio/phono such as this one takes up more space than the average
table radio. The turntable adds weight, too, making the set
more expensive to ship and less convenient to move around the house.
Another factor
may be the decreasing presence of vinyl records. Fewer and
fewer homes have records lying around. And, finally,
a lot of these combo units are not very exciting to look at.
Electronic Restoration
When I got this set, it was completely disassembled. The chassis
looked dirty, but everything was there. Before even checking it out,
I replaced the power cord, whose insulation had cracked and
disappeared in a number of places.
I also replaced the old three-section power filter capacitor with
three modern electrolytic units.
This is a six-tube radio, using 12SA7, 12SK7, 12SQ7, 12SJ7, 35L6GT,
and 35Z5GT tubes. A previous owner had replaced the 35L6GT audio output
tube with a 50L6GT tube. The 50L6 perfoms the same function but uses
50 volts instead of 35.
Why was this done? Well, if you
add up the filament values for all of the tubes, you'll find that
12 + 12 + 12 + 12 + 35 + 35 = 118 volts. That was a reasonable
value in the 1940s, but modern AC lines run higher, around 127 volts.
Adding another 15 volts in the
filament string bumps the total up to 133, which will allow
the set to run a little cooler, possibly extending the life of
the tubes.
As found, the radio seemed to be in decent shape, but it didn't
make any sound at all. No hum, no background hiss, nothing. On closer
inspection, I discovered that a previous owner had removed the insides
from the switch that toggles between radio and phono operation.
Perhaps the "repairman" needed to replace
the insides of a switch on some other, more desirable radio.
Whatever the reason,
this cannibalism removed the connections to the audio output circuit,
rendering an otherwise working radio useless.
Referring to the schematic, it was a simple matter to clip in
some temporary leads and verify that the radio and phono electronics were
in working order. I haven't been able to find a suitable replacement rotary switch
yet. In the meantime, I have installed a temporary DPDT toggle switch
on the back of the cabinet to switch between radio and phono.
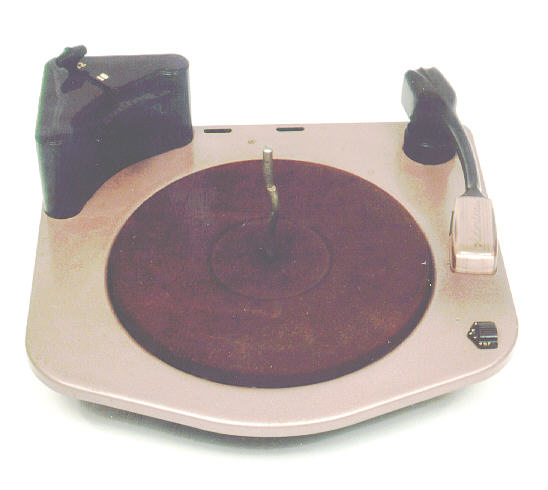
The turntable and changer mechanisms only required cleaning and lubrication.
The most important spot
was the central ball bearing for the turntable. The small amount of
grease still present had dried hard, freezing
the balls solid in their tracks. I used denatured alchohol, toothpicks, and
Q-tip swabs to remove the old gunk and free the balls. Then I relubricated the bearing and popped it back in.
The turntable drive mechanism is pretty simple. The turntable platter is made of
steel, shaped like an upside-down pie plate with straight edges, if that makes any
sense.
The top surface is covered with a dark red flock material. Underneath the platter
is the drive motor and a wide rubber roller. The motor's shaft drives the roller,
and the roller, in turn, rubs against the inner surface of the turntable to make it go.
A little spring holds the roller at the proper tension against the platter.
The rubber on the roller was somewhat dried and bumpy, typical
of phonos of this vintage. I lightly sanded the roller to remove
glaze from its surface, which improved its performance.
You can also send old rollers off to be resurfaced with fresh
rubber, if you like.
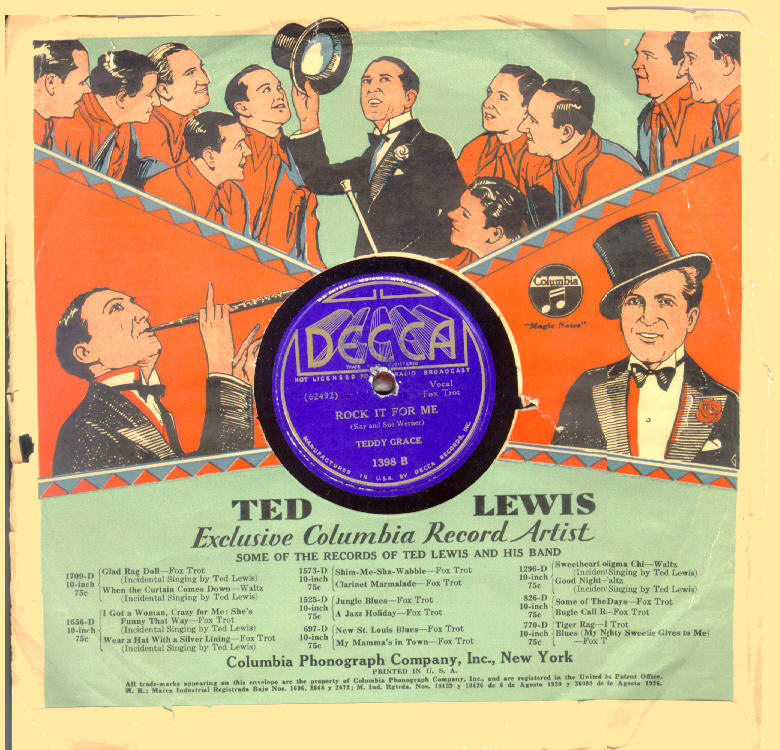
One year, at a Senior Citizen's rummage sale, I bought a big stack of 78 rpm
records from a nice old lady. Almost all of them are foxtrots! Now that I had
a working player, I can't wait to hear those tunes. Some of the record jackets
are pretty colorful and interesting. For instance, check out
this Ted Lewis number. After scanning it,
I noticed that a Teddy Grace record had ended up inside the Ted Lewis jacket, somehow.
Oh, well, the other record and jacket are probably somewhere else in the pile.
A few years after refinishing the cabinet, I replaced the capacitors
in this radio and disposed of it at a swap meet. It was a great-looking set, but I
just couldn't find table space for it. And its new owner was very happy to acquire it.
The price was a total giveaway, considering the hours I had spent restoring the set!
|
