Sparton Model 154B "Bluebird" Mirror Radio (1936)


The mirrored Sparton "Bluebird" is one of the most recognizable, and most desirable, of all antique radios.
I purchased this one in Canada in summer, 2000. The owner told me that his parents received this
radio as a wedding gift in 1936. From the looks of the radio, and the box it was in, it had been stored for
a long time before I bought it.
Description
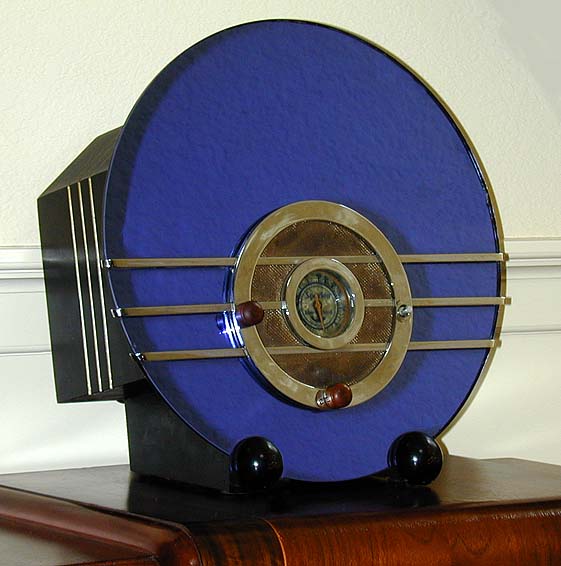
The model number of this Canadian Bluebird is 154B. The American model number for the same radio is 566.
The following photo shows the Bluebird shortly after I brought it home.
At this stage, I had not replaced the radio's wooden knobs with correct chrome-plated knobs. (The slight texture seen in the blue mirror is
the reflection of the of a textured facing wall. It's hard to photograph a big mirror without catching reflections.)
Mirrored radios enjoyed a vogue in the 1930s. The Bluebird was created by Walter Dorwin Teague, one of
the most celebrated industrial designers of his time.
Teague also designed the front of the Scott 800B from the late 1940s.
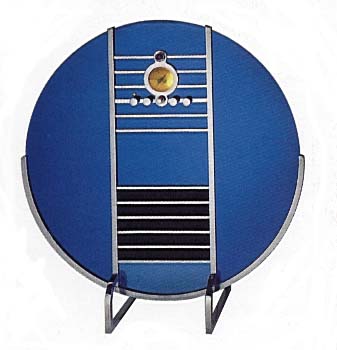
His most spectacular radio design was the famous Sparton "Nocturne," shown in the following photo.
The Nocturne is a console, standing about four feet high. Few were sold, and even fewer survive. If you are lucky enough to
find a complete Nocturne, the selling price will likely run in the tens of thousands of dollars.
The example in this photo was shown in a design exhibit at the Seattle Art Museum in the late 1990s.
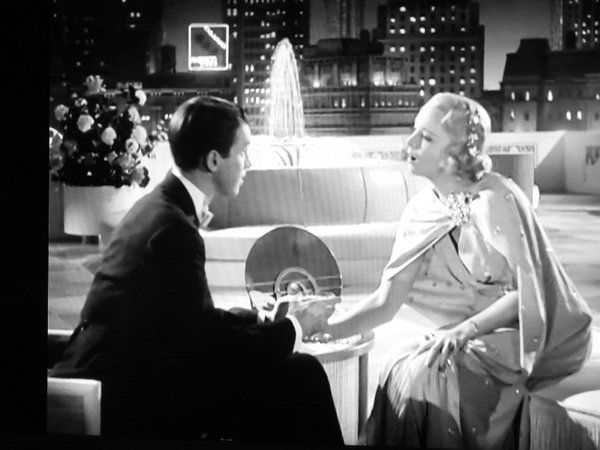
The elegant Bluebird even played a cameo role in a movie! Here it is with James Stewart and Virginia Bruce in the 1936
Broadway musical, Born to Dance.
Sparton also produced this radio with a peach colored mirror, but blue was
the more popular color by a wide margin. Another blue mirrored Sparton is the so-called
"Sled," or Model 557.
The mirror that forms the Bluebird's front panel is 14 inches in diameter, ¼ inch thick, and quite heavy.
The mirror is backed with a layer of dark felt. Chromed trim strips fit through small openings in the circular
dial bezel. A circle of fabric surrounds the small, central dial, giving the appearance of a speaker grille
although the radio's true speaker opening is on top of the cabinet. The dial itself is tiny and quite beautiful,
marked in blue with a graceful bluebird shape in the center.
This set receives only the standard broadcast AM band. The left knob is the power/volume control; the
middle one is the tuner; and the rightmost knob is a three-position tone control.
Two round wooden feet at the bottom of the mirror are strictly decorative. The radio sits on
thick wooden runners, as you can see from the rear view.
My radio is missing one of its decorative ball feet; in the first photo, I added
the second foot through the magic of Paintshop Pro. Someday, I'll get around to replacing the
absent foot; it's a wooden sphere about 1.5" in diameter, with a flat
spot in the rear where it screws into the cabinet base.
The case is painted black, with contrasting whitish trim strips incised into the wood.
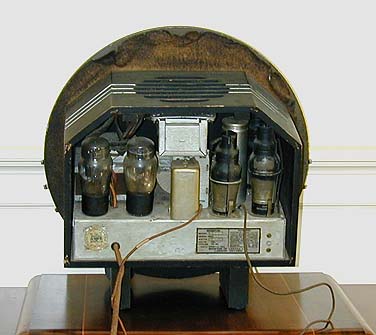
Like many 1930s radios, the Bluebird had no back cover. Two wires leading back from the chassis
allow you to connect an external antenna and ground.
The speaker faces upward through
the grille opening in the top of the cabinet. The speaker, with its attached audio
transformer, is clamped to the cabinet with two rather delicate wooden strips.
The Bluebird is a transformer-type AC radio of conventional design. Here are
the types and functions of its five tubes.
|
Tube |
Type |
Function |
|
V1 |
6F7 |
1st detector/oscillator |
|
V2 |
6D6 |
IF amplifier |
|
V3 |
75 |
2nd detector/AVC |
|
V4 |
42 |
Audio output |
|
V5 |
80 |
Rectifier |
You can download this radio's RCC (Radio College of Canada) service sheet with schematic here.
Restoration
When found, the radio played weakly, and the tuning cord was broken. All the
paper and electrolytic capacitors, except one, were original, suggesting that perhaps it was
not used much. 1930s radios that saw regular service often have several replacement parts.
The next photo shows the radio on the day of purchase, with the chassis removed from the
cabinet. The tuning cord hangs loose, and a thick layer of dust covers everything. But, apart
from one missing knob, everything else is complete and original—a restorer's dream.
In the following photo, everything has
been cleaned up, the tuner has been restrung, and some small splits in the speaker have
been glued.

The next photo gives a view under the chassis.
The Bluebird's chassis is more cramped than most 1930s radios that I've worked on.
The designers obviously wanted to fit everything into a small
cabinet hidden behind the mirror. That made for a sleek appearance,
but rather fussy work when it comes to restoring the electronics.
When replacing capacitors in run-of-the-mill radios, I usually discard the old
paper units and replace them with new ones. The Bluebird is much more valuable than most
sets in my collection, however, so I went to the trouble of "restuffing" all the little
paper capacitors, to preserve an authentic appearance inside and out.
For general information about recapping, see How to Replace Capacitors.
Restuffing Paper Capacitors
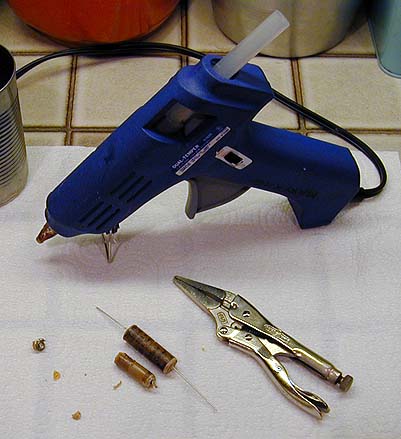
Restuffing capacitors is a straightforward process.
To remove the insides from a paper capacitor, you must heat it until its wax melts. This can be
done with a heat gun or by heating in a low oven. Clean any dirt from the cardboard shell before you heat it and wear gloves to protect your hands.
In this case, I heated the capacitors in an old tin can inside the oven. It took about 20 minutes at 250 degrees.
After the wax has softened, push the insides out of the cardboard shell. If you try to pull them
out, you may just pull the lead out of the foil, leaving most of the capacitor still in the shell.
The next photo shows a paper capacitor whose inside has been pushed out.
In the middle is the cardboard shell. Above it are the old innards and below it is the new replacement.
Immediately after removing the innards, give the outer shell
a quick wipe with a paper towel to remove any blobs and leave a clean coat
of wax on the outside.
After the shell has cooled off, slide the new capacitor into the shell
and fill the empty space with glue from a hot
glue gun. Leave a little space on the ends and let the glue cool until it's solid.
To make the "new" capacitor look exactly as before, melt brown wax into the ends to finish them
off and conceal the glue. I save all the bits of old wax from the original capacitor for this purpose.
There's usually just enough to refill the ends. If you run short, you can mix in some new
beeswax with a little brown color. Another option is to cut little circles of brown cardboard to
fit the ends, although that won't look quite as authentic as wax.
The old shells are typically much bigger than their new counterparts. To avoid wasting
glue, I wrapped the new capacitors tightly in stiff paper until they barely fit inside in the shell.
Then I glued the whole business from each end using hot glue.
The next photo shows the restuffed capacitor ready to put back into the radio. I doubt that
anyone could tell it from before, except that it now looks cleaner than most originals.
The remainder of the restoration was uneventful. After replacing all the capacitors, I
gave the set an alignment and put it back together.
Final Thoughts
The restored Bluebird occupies a prominent place in our home and
it attracts lots of comments from visitors. That's not to say that it's perfect. The mirror has
some minor edge flaking and the cabinet has a few little dings, but I don't mind a few tiny blemishes.
They prove that this is a real Bluebird, not a cheap imitation!
There is a modern company which makes new reproduction radios quite like this.
It's easy to tell the new ones from the real thing: the repros receive FM as well as AM broadcasts,
and if you look inside the back, you won't find a 1930s tube radio chassis.
The large mirror and heavy power transformer make this a very heavy
radio for its size. Rather than risk breakage, I drove a few hundred miles
to pick mine up in person. If you ever must ship one, I'd separate the mirror,
chassis, and cabinet, and pack them all separately in double boxes. See How
to Ship Antique Radios Safely.
|