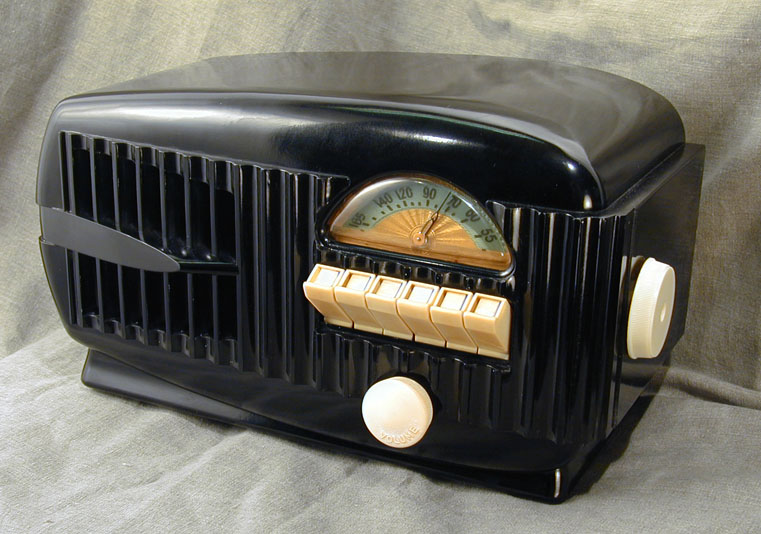
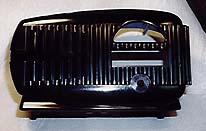
Airline Model 74BR-1508A Plastic Radio (1947)


This dramatically styled radio was originally painted ivory. The old paint was badly chipped,
so I had to strip it. The black plastic case underneath the paint looks so pretty this way
that I'm holding off on repainting it for the time being. (I did the same thing with
my Farnsworth GT-051.)
If you compare this radio to my Belmont 6D111, you'll
see a strong family resemblance. The dials are identical,
as well as the layout of the knobs and pushbuttons.
I assume that this radio was manufactured by Belmont to be sold by Montgomery Wards
under the Airline brand name. That was a common arrangement for retailers such
as Wards and Sears. Belmont built radios for many other retailers, such as
local department stores.
Despite the close similarity, you could not simply stick this radio's chassis into
a Belmont 6D111 cabinet. The pushbuttons on the 6D111 are narrower and each button
protrudes through a narrow vertical slot in the case. The Airline's pushbuttons are wider
and they protrude as a group through a larger horizontal slot in the case.
This radio was also offered in a walnut brown color as model 1507. The 7 at the beginning
of the model number seems to refer to the year 1947. If you look at Airline model numbers
for the years 1946-1949, you'll notice that models from 1946 begin with 6, those from 1947
begin with 7, and so on. Thus, you may find radios with this cabinet and model numbers like
74BR-1508 or 84BR-1507.
Cabinet Restoration
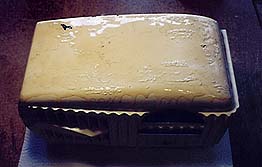
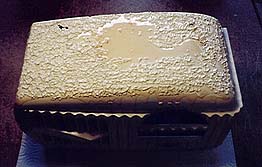
Stripping the paint from the cabinet took a couple of hours. I used Citri-Strip,
an orange gel stripper that has less chemical smell than old-fashioned strippers.
The next two photos show the beginning of this process.
After a few minutes, you will see light paint bubbling as in the first photo.
The second photo was taken ten or fifteen minutes later, when most of the
paint had loosened. If you strip a cabinet, be patient and let the stripper do its
work. After the paint has completely loosened, you can brush it off with an old
paintbrush and clean up with a paper towel.
You can use any kind of stripper on Bakelite, which is extremely tough. This
cabinet is some other kind of plastic (i.e., not Bakelite), but it withstood the Citri-Strip
just fine. If you are not
sure what type of material you have, carefully test the stripper beforehand by applying a
small dot at some inconspicuous place near the back, bottom, or inside of the cabinet.
Better safe than sorry! Stripping is a very messy process. Wear gloves, cover your
work table with layers of newspaper, and have plenty of paper towels or old cloths on hand.
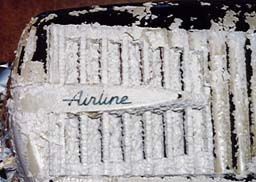
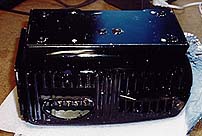
Stripping completely removed the Airline logo that was painted on the dart-shaped front piece shown below.
I took this close-up picture to serve as a guide in repainting that logo, in the event
that I decide to repaint the cabinet. Removing all the paint from these fancy louvers
took a long time. I used wooden popsicle sticks and toothpicks to remove loosened
paint from the curved surfaces and corners.
The next photo shows the cabinet after almost all paint had been removed.
Pointed toothpicks, and even straight pins, become very useful for removing the
last specks of paint from tight crannies. The last specks can be quite stubborn.
If necessary, you can apply another dose of stripper to remove them, once the
bulk of the old paint has been removed.
Don't use a metal scraper under any circumstances. In most cases,
the finish underneath factory paint will be beautifully smooth and
shiny. If you mar it with hard scraping, you will create hours
of extra work in polishing out the scrape marks.
At last, the cabinet has been completely stripped and polished. If you were going to
repaint the cabinet, you would go on to apply a coat of primer, followed by one or
more finish coats as needed. I have used ordinary auto spray paint with good success
on this type of cabinet. Bring the cabinet to the auto store to ensure a good color match.
The knobs only required a little polishing. Use extreme caution if you have to remove
paint from these knobs. They are made of soft plastic.
Electronics
The electronics on this set have been restored and it plays very well.
This phase included the standard steps: cleaning the tuner
and controls with electronic cleaner,
replacing old capacitors, and realigning the radio. The
final photo shows the chassis underside after recapping.
The electronics are conventional, using six tubes and a built-in loop antenna.
See my Belmont 6D111 page for the tube lineup and some
additional views of the chassis.
I'm not crazy about this type of pushbutton tuning, which mechanically moves
the tuner to preset points. Like all mechanical systems, it will need
readjustment from time to time. A better scheme, in my view, is an electronic
system like the one used in my Zenith 12-S-471. Of
course, this plastic tabletop sold for a small fraction of the price
of that mighty Zenith console!
Final Thoughts
This radio is desirable because of the unusual cabinet design. I would value
it at around $100, although I paid much less ($30) at a swap meet because
the paint was in awful shape. The Machine Age
to Jet Age collector guide values this set at $225, but I consider
that valuation high. Wards sold lots of radios and this
model is not that scarce. (Many of the values in that book are
inflated; I use it as a model reference, not a price guide.)
|