|

How Can I Fix My Old Tube TV?
Hardly a week goes by without someone sending me a message like this:
Help, Phil! I just bought an old TV and it looks great.
But when I turn it on, the screen only makes a horizontal line (or doesn't light up, etc.)
What should I do??
Here are some answers to get you started.
Should I turn on my TV to try it out?
In a word, no! For tube-based TVs (those made from the 1940s through mid-1960s), it's
pointless and risky to turn the set on for a test. You won't learn anything useful,
and you might destroy expensive and hard-to-find parts, such as a power transformer.
Imagine that you just found a 60-year old car sitting in a barn. You wouldn't expect
to simply top up the gas tank and race off on a cross-country trip. Same with a
60-year old TV. It's full of ruined electrolytic and paper capacitors that degrade
with age whether or not the set is used. Until the TV has been recapped,
it's unlikely to work at all, much less display a clear picture.
Should I fix my TV myself, or hire someone to do it?
If you haven't repaired any tube devices before, a television is not a good beginner's project.
Tube TVs are much more complex than radios and their power supplies create higher voltage.
Back in the day, when your TV was still fairly new, a repairman might fix it by popping in a new tube
or two, but those days are long gone. The passage of decades has turned many of your TV's
old capacitors into garbage, so merely replacing tubes—even 100% of the tubes—won't
magically bring it to life.
The Televisions section of this website has a few
dozen articles explaining how I restored different vintage TVs. If you skim a couple of
those articles, you'll get a clearer idea how much work is needed to get the
average old TV working again.
If you're a tube-repair newbie and you're determined to fix the TV yourself, I recommend practicing
on a simple tube radio to learn basic restoration skills. After you have successfully
restored a radio (or two, or three), you'll have a better idea how to approach a
much more challenging TV project. The Beginner's section of this
website has several articles to help you get started repairing tube radios.
If you have successfully restored some tube radios, it's not a huge leap to tackle a tube
TV. But you must be willing to do some homework and prepare for a large-scale project.
How much will it cost to restore my TV?
Hiring a professional to restore your vintage TV will be expensive. A complete
electronic restoration is a labor-intensive job, requiring the replacement of dozens of
age-damaged components (mainly capacitors), not to mention fixing other problems that
your TV might have. I'd expect to pay at least $200 for the electronics, and likely more.
If your TV's wooden cabinet needs refinishing, that's an additional cost.
Professional refinishing is also labor-intensive; I have paid anywhere from
$400 to $800 to have a large TV cabinet completely redone.
If you spend hundreds of dollars restoring a vintage TV, don't expect to recover
that money by reselling the restored set. The market for restored tube TVs is
practically nonexistent—many people wouldn't even know how to play a program
on such a TV—so don't spend a fortune on restoration unless you
plan to keep your set forever.
Where can I find someone to fix my TV?
It's preferable to find a repairman within driving distance, since shipping your TV away
for repair would be risky and expensive. Start by contacting a radio/TV collector
club in your area for a recommendation. The Antique Radio Classified website
has a list of clubs
throughout the world. Even if the nearest club isn't next door, they might know someone closer to you.
Collectors live everywhere, not only in big cities.
You could also place a free "TV repairman wanted" ad in the Classified
sections of the VideoKarma or
Antique Radios forums.
In both forums, you need to sign up as a member (it's free) before posting
your first message there. (These forums are also excellent sources of advice
on restoration topics.)
How can I watch programs on my old TV?
When your old TV was new, you could receive free, "over the air" (OTA) TV
signals simply by connecting an antenna and turning the set on. Those signals disappeared
in 2008-2009, when the USA switched from analog TV broadcasts to
digital broadcasts.
You can still receive free TV broadcasts with an antenna, but the new TV signals are in a digital format
that your obsolete analog TV can't decode.
To watch free OTA shows, as in the old days, you need a
digital converter box to
translate the new digital TV broadcast into the analog form that your TV can digest.
These boxes are inexpensive; you might even find a used one in a thrift store.
Before the switchover to digital TV, it was possible to connect an old TV directly to
your cable TV box with a coaxial cable and antenna matching transformer. Now, many cable
companies have switched from analog to digital signals, so you should contact your cable
company to see if it still transmits analog signals.
Of course, you can also watch prerecorded TV shows and movies using a video source such as
a DVD player, tape player (VHS or Beta), or other video device.
If your video source has a coaxial output labeled something like TO TV, TV OUT, or RF OUT, you can connect
a coaxial cable to that output and then connect the cable to the TV's antenna terminals with a
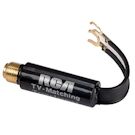
small
antenna matching transformer like this:
If your video player has three composite outputs (one video, two audio) in the back,
you need an inexpensive RF modulator box
to combine those three signals into an RF signal that your old TV can decipher. Then, just
as described above, you connect your RF modulator box's output to a coaxial cable with
an antenna matching transformer that screws onto your TV's antenna terminals.
Finally, if you get a higher-powered RF modulator called an "agile modulator," it's possible to set up
a flea-power TV station in your home, broadcasting signals to any TV in the house that has
a rabbit-ear antenna. See: Creating a Home TV Transmitter.
Unlike an ordinary RF modulator, these special modulators have enough power to send
signals through the air for short distances.
Is there a repair book that I can read?
Yes and no. There are no contemporary books explaining how to restore
vintage TVs. (However, there are recent books on radio restoration; see
Antique Radio/TV Books.)
Many TV repair books published in the 1940s-1960s are available
through used-book sources. An example is Elements of Television Servicing
by Marcus & Gendler. These can be excellent references, with a couple of caveats:
First, these books were written for the armies of experienced radio repairmen who wanted to
learn to fix TVs. The books assume that you already understand tube electronic theory and fundamental
repair techniques; if you need instruction in those basics, you'll need to go elsewhere.
Second, old TV repair books were written when these sets were new,
so they explain how to fix problems that would arise during the first years of
a TV's service life. Nowadays, those same TVs have undergone decades of aging,
creating extra problems—especially mass failure of paper and electrolytic capacitors—that
didn't exist, back in the day. Thus, the books won't make any mention of wholesale
recapping, although that's a major task for TV restorers nowadays.
And today's restorer may encounter other problems, such as chassis rust or rodent damage, that were too rare to
mention when these books were written.
In short, there's a difference between repair, as it was practiced decades ago, and
restoration, which is necessary now. Old repair books describe standardized
methods for quickly locating one or two defective parts and replacing them, using the
assumption that the other 98% of parts in the TV are still new and functional. Those methods
are useful after you have recapped the TV (at least, partly) and taken other
steps to cure the effects of aging (see First Steps
in Restoration). If you try to use those diagnostic methods prematurely, when a TV is still full of
ruined old capacitors, you may get very confusing results.
Are parts still available?
Yes. Commonly needed electronic components are readily available (see my Parts page).
These include capacitors and resistors, as well as small tubes. Many millions of small tubes
were manufactured during the tube era, and they're still mostly common and cheap.
Picture tubes (CRTs) are another story. The mass manufacture of picture tubes faded out decades
ago, and the supply of unused ("new-in-box") CRTs dwindled rapidly. No stores
or online companies sell new picture tubes; they are only available in the second-hand market. In the
old days, there were many companies who rebuilt old picture tubes, reviving them to like-new
condition; those companies have also disappeared.
Consequently, it may cost $100 or even more to replace a ruined picture tube. For this reason, as
we'll explore later, it's a good idea to check the condition of a TV's picture tube before
deciding how much to pay for the set.
Do I need to get a schematic diagram before I start?
Absolutely! Tube TVs are complex devices made of hundreds of parts. Repairing
the TV usually means replacing a few dozens of those parts: snipping out each old
component and soldering in a new one of the correct value, over and over.
The schematic gives you a roadmap for the TV, showing how it works,
and it also lets you check off each new part as you install it. When you are
replacing many parts, it's easy to make an error like installing a part of
the wrong value (say, .001 mfd instead of .01 mfd) or connecting a wire
to the wrong place.
The schematic or service manual may also include other useful info, like
a chart showing the correct voltages for every pin of every tube in the TV when
it's operating normally.
You can find free schematics for many vintage TVs in the
archive
of the Early Television Foundation website. You may also be able to copy Riders and
Sams service manuals by visiting the reference desk at a decent-sized public library.
Any Sams service manual can be purchased directly from Sams.
Sams manuals and Riders TV service books are also sold on eBay, although you may
need to patient when seeking a specific document.
Do I need to replace all the tubes?
No! A common misconception about radio/TV repair is that you should
start by replacing tubes. Other components, especially capacitors,
are more common causes of trouble.
Like a light bulb, an electronic tube is vacuum-sealed; it doesn't
deteriorate from simply sitting around. You don't need to replace
a tube unless you have some evidence that it has failed. My article
First Steps in Restoration
describes a simple dud/not-dud test that you can perform on each tube to
see if it's completely dead.
What tools and equipment do I need?
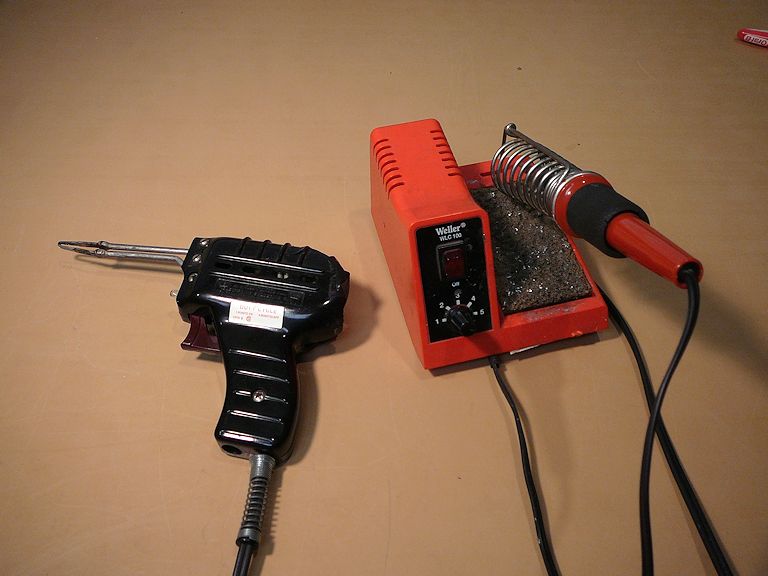
The most essential tool is a soldering iron or soldering gun, available
from many sources. You'll also need a roll of electrical solder, of course.
I have used this gun and iron to restore many sets; both came from garage sales:

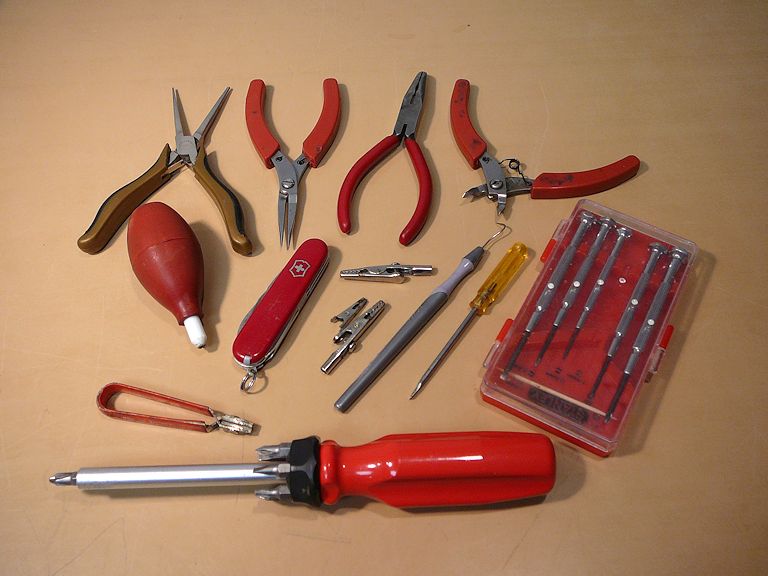
You may already own the other small tools you'll need: a
few screwdrivers (Phillips and normal head) in different sizes, a small
adjustable wrench, pliers (regular and needle nose), wire cutter,
a knife for stripping insulation from wire, and the like.

In this photo, the red bulbous object is a "solder sucker," used for
removing excess solder from old joints. The tool shaped like a dental pick is
a stainless-steel hobby pick, handy for removing snipped pieces of wire from a solder
terminal. The small metal alligator clips are used as heat sinks; you can clamp
them onto the lead near a delicate component, to prevent overheating while it's
being soldered.
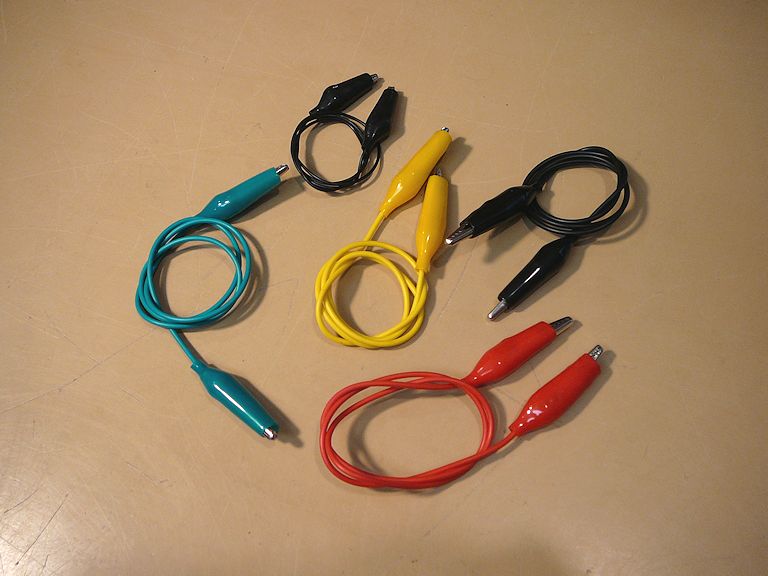
Speaking of clips, you'll also want to get (or make) a few clip leads like these, to
make temporary connections on your chassis for test equipment, and so on:

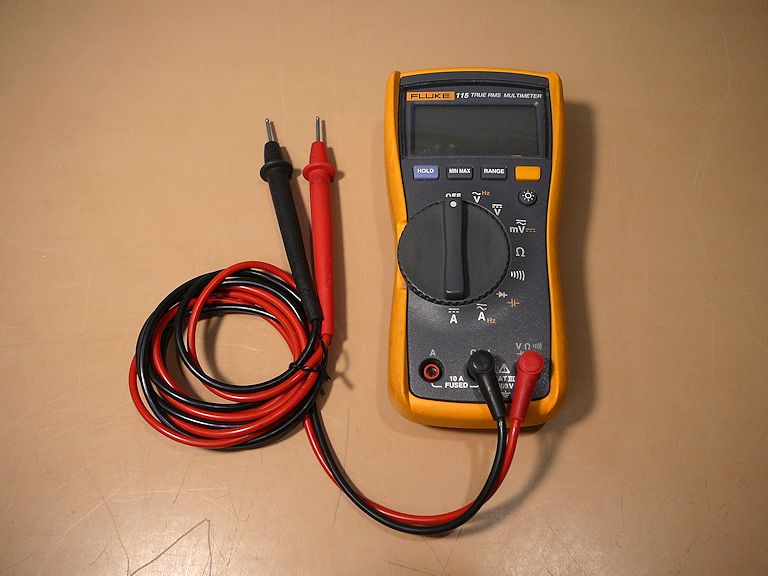
Beyond hand tools, the most often-used piece of equipment in any restorer's workshop is
a multimeter, a small device that
measures voltage and resistance. Multimeters are available from many sources. For about $25, you can find
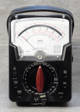
one that gets the job done and lasts for years. Here is my everyday multimeter:

This modern Fluke meter has a digital numeric readout. In a few cases—notably,
aligning radios and TVs—it's a little easier to use an analog meter, which displays
a value with a needle on a scale; when you're turning an adjuster back and forth, seeking a peak point
in a range, it's easier to watch a swinging needle than to decipher a changing stream of digits.
You can often find used meters at a radio/TV swap meet or flea market. These meters may be
quite cheap, but keep in mind that a vintage (say, 50-year old) meter may itself require restoration,
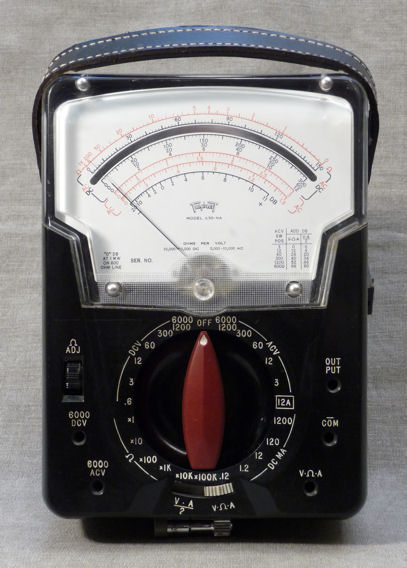
like any other old device. The next photo shows my
Triplett 630-NA meter, a $20 swap meet find:
If I were just starting out, I'd buy a new multimeter: something more modern than the Triplett and less pricey than the Fluke.
What equipment is nice, but not necessary?
Beyond a multimeter, there are a few pieces of test equipment that are occasionally nice
to have, but not vital for a casual restorer. These include signal generators, tube testers,
CRT testers, and oscilloscopes.
Signal Generator
For frequent repair work, the next most useful item after a multimeter is
a signal generator, a device that can generate audio and RF (radio
frequency) signals.
Signal generators are useful for diagnosing troubles. By injecting a known signal
into various stages of a radio or TV's circuitry, you can zero in on the source
of a problem. For instance, if you inject an audio signal into
the audio output stage and no sound comes out of the speaker, you know there's
a problem in the audio output section.
A signal generator is also useful for realigning radios and TVs, although that specialized
procedure isn't always necessary.
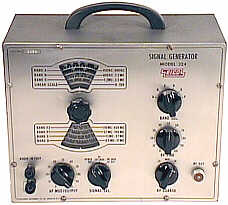
Here are two of my signal generators: a simple "service grade"
EICO 324 and a fancier (and much pricier!) "laboratory grade"
HP 8660C:


If I were starting out, I'd buy a new signal generator with features like the
EICO 324. A Rolls Royce-quality device like the HP 8660C is overkill
for a casual restorer.
Tube Tester
Many people ask me whether they'll need a tube tester. My answer is no, for a beginner.
Tubes are comparatively reliable, and there are other ways to check them.
My article First Steps in Restoration explains how
to perform a simple dud/not-dud test on a tube using an ohmmeter.
You can also substitute a known-good tube in
place of a suspect tube, to see if the radio or TV plays better.
Conversely, you can put a suspect tube into a radio or TV that already
works, to see if the performance changes.
If you restore more than a handful of sets per year, a tube tester may be worth having.
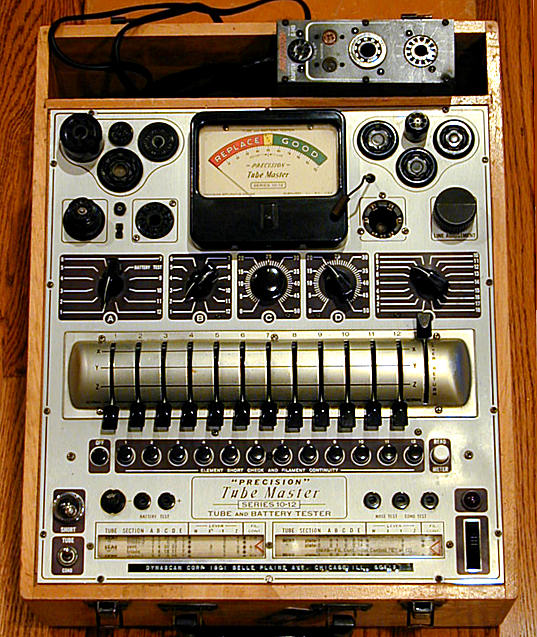
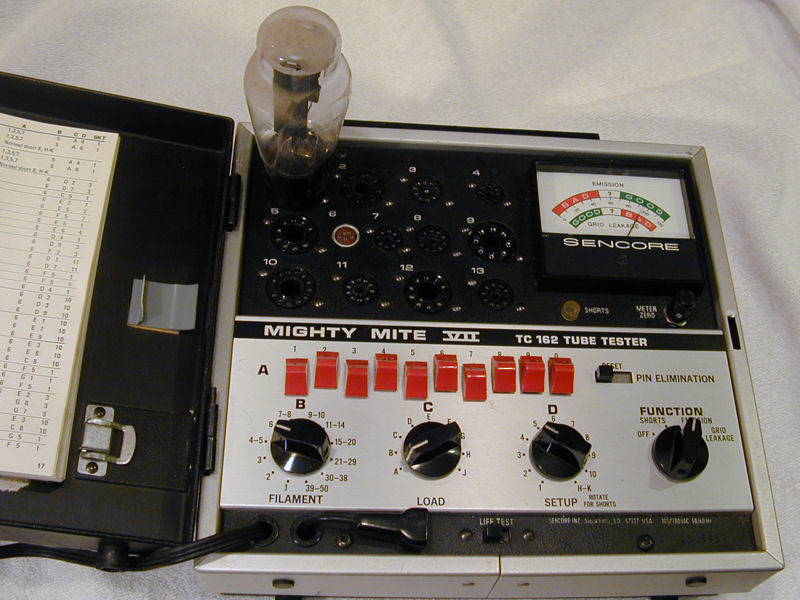
These photos show two of my tube testers, a vintage Precision 10-12
and a modern Sencore TC-162 "Mighty Mite":


The Mighty Mite is my everyday tester for small tubes. The Precision can check certain long-obsolete tubes
that the Sencore can't handle, so I might haul it out once or twice a year for those cases.
No tube tester is infallible, not even the costly ones. Simple emission-type testers like
mine are mostly good for culling out very weak (or dead) tubes when you first purchase a set.
Fancier mutual conductance-type testers can check more tube characteristics, but they don't
necessarily tell the whole story. Sometimes a tube that looks "weak" on a tester
will perform just as well as a brand-new tube in a particular circuit. And certain tube
functions, such as oscillation, can't be judged by any tester.
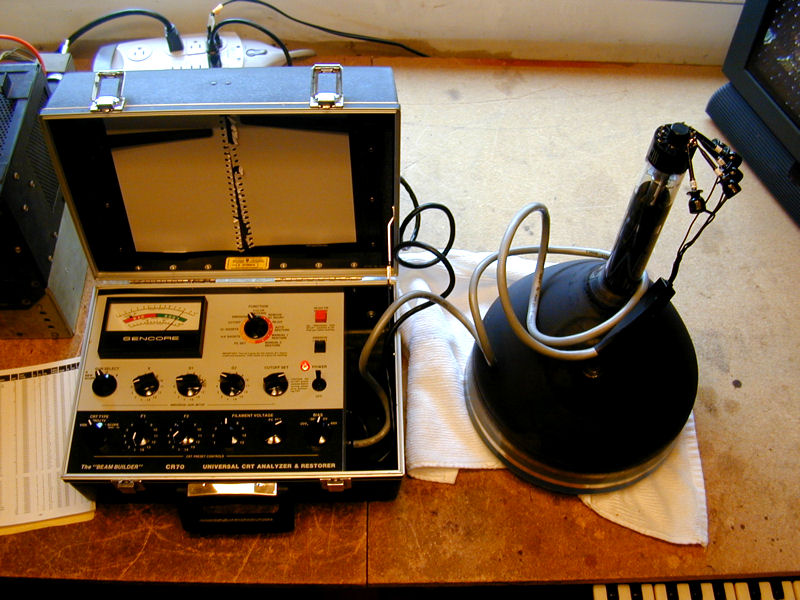
CRT Tester
A CRT tester is a special instrument for checking TV picture tubes (CRTs). If you are thinking
about buying a vintage TV, it's prudent to check the CRT before purchasing, since replacing
a dead picture tube might cost as much as the TV itself. In this photo, I'm using my
Sencore CR70 tester to check the CRT from my RCA 721TCS television:

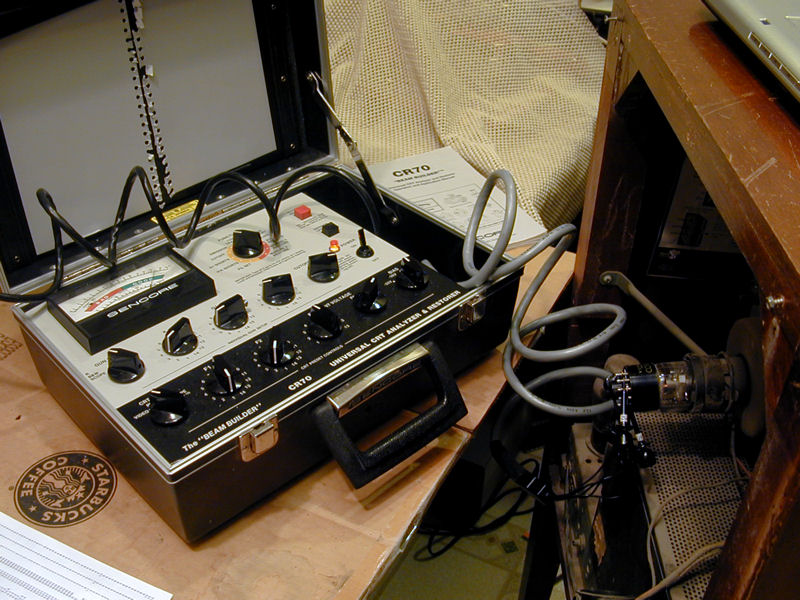
It's not necessary to remove the picture tube before testing, as done in the previous photo. If you're
checking out a TV prior to purchase, you can remove the back, unplug the CRT socket, and test the
picture tube in place, as I did with my Philco 49-1240 television:

Long-unused CRTs often look very weak at first, and then gradually increase emission after they have
"cooked" at normal filament voltage on a tester for a while. Don't prematurely condemn a CRT
because it tests weak after only a few seconds on the tester.
Many CRT testers have various "restore" or "rejuvenate" functions, intended to revive
tired picture tubes. Be extremely cautious about using these functions; some testers use harsh methods which,
if used unnecessarily, can kill an otherwise-usable CRT in a flash. I consider these an absolute last
resort. When in doubt, don't rejuvenate!
Before you rush out to buy a tester that you might use only once, try contacting a radio/TV collector club
near you. Perhaps someone there can lend you a tester or test your CRT if you bring it to him. You'll find a
list of clubs at the Antique Radio Classified website.
Finally, there is a discussion in
the ARF television forum that describes how to do a quick CRT test using a DC power supply and a voltmeter.
I haven't tried this method, but you may want to give it a whirl, if you have no access to a CRT tester.
Oscilloscope
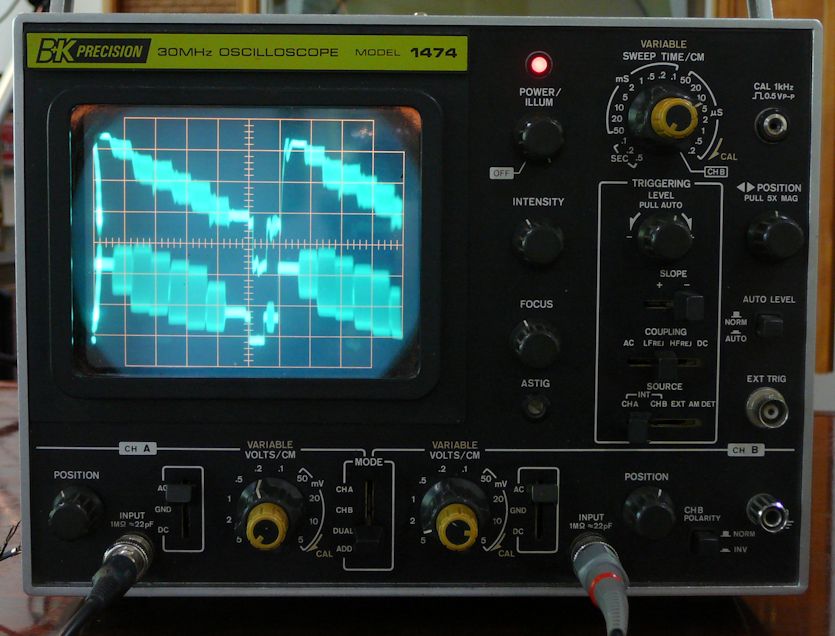
An oscilloscope can be used to view waveforms in a radio or TV and to make various measurements.
Here, I'm viewing a horizontal waveform in my RCA CTC-4
color TV:

Service manuals often include model waveforms for important spots in various circuits,
so you can compare the shape of your measured waveform to the model and judge whether that circuit
works correctly.
An oscilloscope is often used with a signal generator or pattern generator. The idea is to inject
a known signal at a certain spot in your radio or TV's circuitry, and then view what your set
does with that signal. In this photo of my dual-trace scope, I am viewing the video output from my TV pattern generator
(the "known signal" in the lower trace) and comparing that to the waveform seen at the TV's video amplifier tube
(the measured signal, in the upper trace):

Oscilloscopes are not really needed in restoring AM radios. I have occasionally used one to
realign an FM radio, but you can do FM alignment with other methods (using a signal
generator and multimeter). Scopes are more useful in TV restoration, but
even there, you won't need one for every project. Keep in mind that an oscilloscope is more
complex than simpler test instruments; learning to use one involves some extra homework
and practice.
Other Test Equipment
I own other, more specialized pieces of test gear, such as capacitor testers, TV pattern generators,
a milliammeter, a frequency counter, and so on. You can read about some of them in the Miscellany
section of our Gallery. Each has its place, but none of them is used often.
An example is my BK Precision 1077B Television Analyst,
which can do a variety of specialized tasks for TV restoration. Not every project
needs those operations, so I only haul it out occasionally.
How can I refinish the cabinet?
Refinishing wooden radio/TV cabinets is no different than refinishing any wooden
furniture. My favorite book on wood refinishing is
The Weekend Refinisher by Bruce Johnson. For more details, see
Antique Radio/TV Books.
In this website's Restoration section, you'll
find articles describing how I refinished various types of cabinets.
My preference, which is shared by many collectors, is to restore wooden objects
without making them look "newer than new" or erasing all evidence of age and use.
If you strip or sand an antique cabinet down to bare wood, you may destroy its
collectible value, along with its character. The same goes for applying non-authentic
finishes, such as glossy polyurethane. The Weekend Refinisher explains
how to detect what finish is on a piece and restore it authentically.
Restoring Bakelite or plastic cabinets is mostly a matter of cleaning and
polishing. I recommend starting with the gentlest possible means and
materials and resorting to stronger methods only if necessary. I begin
with warm, soapy water, some clean, soft cloths, and a soft
toothbrush for the small crannies. Cotton Q-tips and round toothpicks also
come in handy for tight spots. Beware of powerful solvents, especially when working
with an unknown modern plastic. Nothing is more disheartening than
watching your newfound treasure start to dissolve under your fingertips!
For everyday cleaning, I use nothing stronger than Windex or isopropyl
alcohol (rubbing alcohol).
For cabinet polishing, I prefer Novus Plastic
Polish, grades #1 and #2, available from Antique Electronic Supply.
Novus polish is gentle enough to safely polish the most delicate plastic dial covers, yet the #2 grade
works on Bakelite, too. Other collectors polish with various substances,
such as very fine-grade automotive rubbing compound, power buffing wheels, and so on.
Some collectors wax Bakelite cabinets after polishing, but I've not found that
worth the bother, if you've done a good job of polishing. Be patient
and stay with soft cloths and elbow grease.
Caution: the shiny surface layer of Bakelite is quite thin; if you polish too hard with harsh abrasives,
you'll dig down into the pulpy underlayer of the Bakelite, which nothing will make shiny again. If
your cabinet is damaged from sanding or too-harsh polishing, the only remedy is to repaint it.
Cracks in Bakelite and plastic cabinets be re-glued with cyanoacrylate ("crazy glue") if the break is clean.
Larger defects in a plastic cabinet can be patched with a product
called "Plas-T-Pair," available from Antique
Electronic Supply. Larger breaks in a Bakelite cabinet may
be harder to repair, although I have heard of people patching them
with a mixture of ground Bakelite and some sort of glue.
What's the Best Way to Learn?
The best learning method is to watch over the shoulder of an experienced
repairman. If you join a local radio/TV collector's club, you might find
someone willing to give you some pointers.
Our Restoration section has many articles on restoring specific
radios and TVs. These articles contain all sorts of tips and practical advice about
repairing electronics and refinishing cabinets. Books, as mentioned earlier, are another
excellent resource.
Finally, check out the two vintage TV forums mentioned earlier: VideoKarma and
the ARF's Antique Television Discussions. Browsing
the archives of these forums will uncover a wealth of information about restoration techniques, and you can also
ask forum members for advice about your project.
Have fun!
|